How to Use Light Painting in Food Photography for Dramatic Effects
If you’re a food photographer looking to spice up your portfolio or just a culinary enthusiast eager to showcase your latest creation in the best light, literally, light painting might just be the technique you’ve been searching for. This simple yet dramatic technique involves using a moving light source during a long exposure to illuminate the subject – in this case, food – creating a stunning image that’s sure to capture attention. This article will guide you through the basics of light painting in food photography and how you can achieve those mouth-watering, dramatic effects with ease.
Understanding Light Painting
First of all, light painting is a photography technique that might seem complicated but is in fact quite simple to grasp with a little practice. In essence, you will be using a light source, like a flashlight or LED light, during a long-exposure photograph to selectively illuminate parts of your food subject. The beauty of this method lies in the control it offers over how the subject is lit, allowing for creative and dramatic results that standard lighting setups can struggle to achieve.
Step 1: Gear Up
Before you dive into light painting, you’ll need to ensure you have the right equipment. Here’s a checklist:
– A camera capable of manual settings, including long exposures.
– A sturdy tripod to keep your camera steady during long exposures.
– A light source – LED lights, flashlights, or even smartphone torches can work.
– Your food subject, preferably set against a dark background to enhance the dramatic effect.
Step 2: Setting Up
Place your food arrangement on a stable surface. A table works fine, but make sure there’s enough space to move around it. Mount your camera on your tripod and position it so that your food subject is in the frame. It’s vital to choose a relatively dark environment or shoot during nighttime to minimize other light sources, which could affect the final result.
Step 3: Camera Settings
Set your camera to manual mode. You’ll be working with long exposures, so start with a shutter speed of about 10 seconds. This may need adjustment depending on how long it takes you to ‘paint’ your subject with light. Set your ISO as low as possible to avoid grainy images. Finally, adjust the aperture (f-stop) based on how much depth of field you want. A good starting point is around f/8.
Step 4: Ready, Set, Paint!
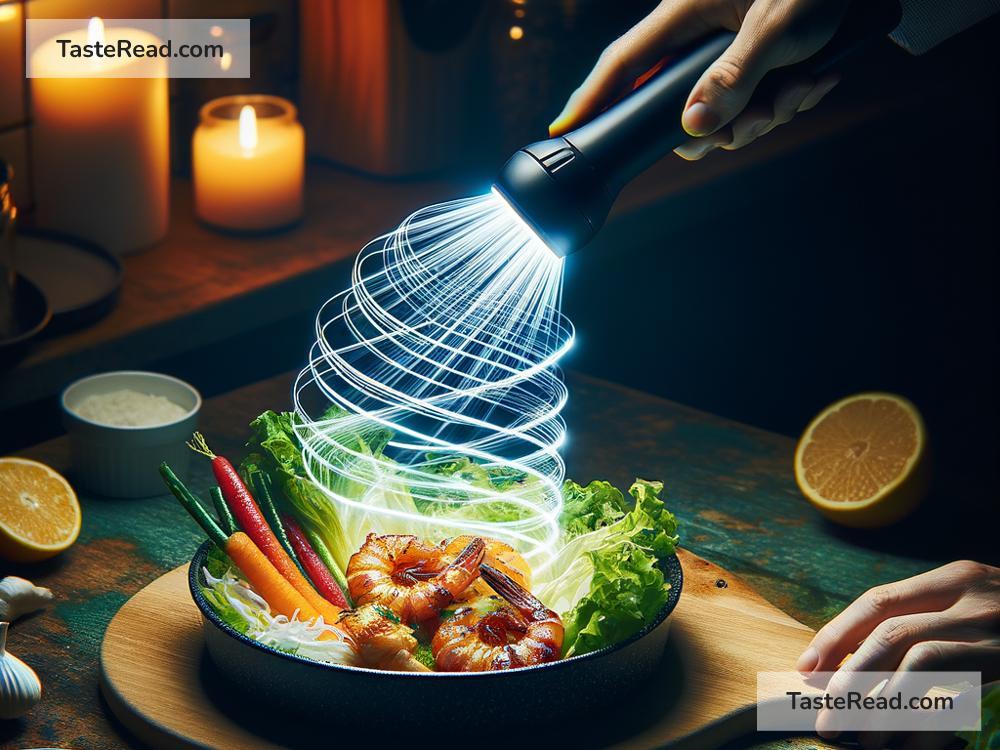
Once everything is set up, hit the shutter button to start the exposure, and quickly move into position with your light source. Now, it’s time to let your creativity shine. Begin “painting” your subject with light. This means moving the light around your food, highlighting specific features you want to draw attention to, like the glisten on a slice of cake or the texture on a piece of fresh fruit. Experiment with different motions—circular, back and forth, or side to side—to see what effects they produce.
The key here is experimentation. Your first few attempts might not turn out exactly how you envision, but with practice, you’ll get a feel for how the light behaves and how best to sculpt it around your subject for those dramatic effects.
Step 5: Review and Refine
After each exposure, review your image. Look for areas that are over or under-lit and adjust your light painting technique accordingly. You may also need to tweak your camera settings, especially the shutter speed, to allow more or less time for your light painting.
Tips for Dramatic Results
-
Selective Lighting: Instead of illuminating the entire dish, highlight just a part of it. This can create a focal point and add a dramatic flair.
-
Colors Matter: Some light sources come with color options. Use different colors to add a unique look or to complement the colors of your food.
-
Add a Story: Use light trails to guide the viewer’s eye or suggest motion. This can add an element of storytelling to your image, making it more engaging.
Conclusion
Light painting in food photography offers an exciting opportunity to bring drama and creativity to your culinary images. By understanding the basics and practicing, you can produce stunning, dynamic photographs that showcase your food in an entirely new light. Remember, the essence of light painting lies in experimentation and patience. So, grab your camera and a light source, and start painting with light. Who knows? You might just create your next masterpiece.