Mastering Homemade Apple Pie: A Classic American Recipe
Apple pie is one of those dishes that brings people together. It’s warm, comforting, and full of flavor. Whether it’s for a holiday, a special dinner, or just a weekend treat, nothing beats the taste of a homemade apple pie. Although making apple pie from scratch might seem tricky at first, it’s actually very simple when you break it down step by step. In this blog, we’ll walk you through everything you need to know to prepare a perfect apple pie at home.
Why Is Apple Pie So Special?
Apple pie is often called a “classic American dessert.” It’s been loved for generations and often symbolizes family gatherings, celebrations, and even cheer during tough times. The blend of tart apples, warm spices like cinnamon and nutmeg, and the buttery, flaky crust makes it a treat that feels like a hug in dessert form. Making it yourself gives you a chance to customize flavors, impress your loved ones, and enjoy the satisfaction of creating something delicious from scratch.
Tools and Ingredients You’ll Need
Before you begin, it’s important to gather all the tools and ingredients you’ll need. This helps to keep things organized and stress-free.
Tools:
- A mixing bowl
- Measuring cups and spoons
- A rolling pin
- A pie dish
- A peeler and knife (to prepare the apples)
- A pastry cutter or fork (optional, for making the crust)
- Baking parchment or a clean surface for rolling out dough
Ingredients for the Crust:
- 2 ½ cups all-purpose flour
- 1 teaspoon salt
- 1 tablespoon sugar (optional, for a slightly sweet crust)
- 1 cup cold butter (unsalted, cut into pieces)
- 6-8 tablespoons ice-cold water
Ingredients for the Filling:
- 6-8 medium-sized apples (Granny Smith works great for tartness, but you can mix varieties like Honeycrisp or Fuji for sweeter flavors)
- ¾ cup sugar (you can adjust depending on your taste)
- 2 tablespoons all-purpose flour
- 1 teaspoon ground cinnamon
- ¼ teaspoon nutmeg
- 1 tablespoon lemon juice (to brighten flavors)
- Butter (for dotting on top, optional)
Step 1: Making the Crust
A good pie starts with a flaky, buttery crust. While store-bought crust is an option, homemade crust tastes better and gives you full control of the flavor.
- In a large mixing bowl, combine the flour, salt, and sugar.
- Add the cold butter pieces to the bowl. Use a pastry cutter, a fork, or your fingers to blend the butter into the flour until the mixture looks crumbly. Small pea-sized butter chunks are fine—these make your crust flaky!
- Gradually add the ice-cold water, one tablespoon at a time. Mix gently until the dough holds together. Be careful not to overmix—you only want the dough to combine.
- Divide the dough into two equal parts. Flatten them into discs, wrap in plastic wrap, and chill in the fridge for at least 30 minutes. This makes the dough easier to roll out later.
Step 2: Preparing the Filling
While your dough chills, prepare the delicious apple filling.
- Peel and core your apples, then slice them into thin, even pieces.
- In a large bowl, mix the apple slices with the sugar, flour, cinnamon, nutmeg, and lemon juice. This mixture creates a mix of sweet and spicy flavors with a hint of brightness. Let it sit for a few minutes so the flavors can blend.
Step 3: Rolling Out the Dough
Once your dough has rested, it’s time to roll it out.
- Lightly flour a clean surface and your rolling pin.
- Roll out one disc of dough into a circle about 12 inches wide and 1/8-inch thick. Make sure it’s slightly larger than your pie dish so it can cover the edges.
- Gently place the rolled-out dough into your pie dish. Press it down lightly to fit snugly.
Step 4: Adding the Filling
Pour the apple mixture into the pie crust. Spread it evenly but don’t flatten it—piling the apples high gives the pie that lovely domed look. Dot the apples with small pieces of butter if you’d like a richer taste.
Step 5: Topping the Pie
Roll out the second disc of dough to create the pie’s top layer.
- You can cover the pie with a full crust by placing the rolled-out dough over the apples and sealing the edges. Then, cut small slits in the top for steam to escape.
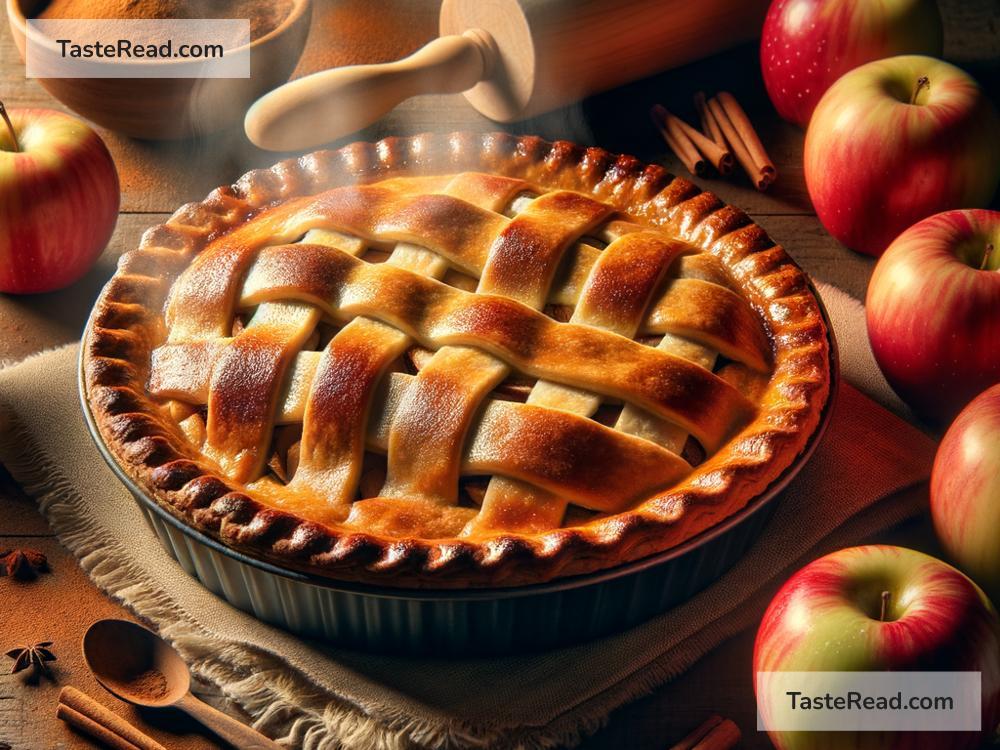
- If you want to be artistic, try a lattice design. Cut strips of dough and weave them across the top of the pie for a decorative look.
Seal the edges by pressing them together with your fingers or a fork.
Step 6: Baking the Pie
Preheat your oven to 375°F (190°C). Place the pie on the center rack and bake for 50-60 minutes, or until the crust is golden brown and the filling bubbles.
If the edges of your crust brown too quickly, use aluminum foil to cover them and prevent burning.
Step 7: Cooling and Serving
Let the pie cool for about an hour. This allows the filling to thicken properly. Serve warm with a scoop of vanilla ice cream or whipped cream. It tastes heavenly!
Tips for Success
- Use cold butter in your crust—it’s the secret to flakiness.
- Mix tart and sweet apple varieties for a balanced flavor.
- Don’t skip the lemon juice—it keeps the apples from browning and adds brightness to your filling.
Final Thoughts
Homemade apple pie is a tradition worth learning and sharing. Once you master this recipe, you’ll have a go-to dessert for any occasion. It takes a little bit of time and patience, but the results are absolutely worth it. The smell of cinnamon and apples baking in your oven will make your home feel extra cozy, and your family and friends will be asking for seconds in no time. Give this recipe a try and enjoy every slice!