Step-by-Step Guide to Perfecting a Light and Fluffy Pavlova
Who doesn’t love a dessert that’s both light and sweet, with a crisp shell and marshmallow-like interior topped with whipped cream and fresh fruit? Pavlova, named after the famous Russian ballerina Anna Pavlova, is a favorite treat across the world, especially in New Zealand and Australia. While its pretty appearance may make it seem complicated to make, crafting the perfect pavlova is surprisingly simple, as long as you follow a few key steps and tips.
In this blog, we’ll take you through each stage of making a perfect pavlova, using simple language for anyone to follow. Whether you’re a pro in the kitchen or just starting out, this guide will help you create a dessert that’s as delicious as it is beautiful!
What is Pavlova?
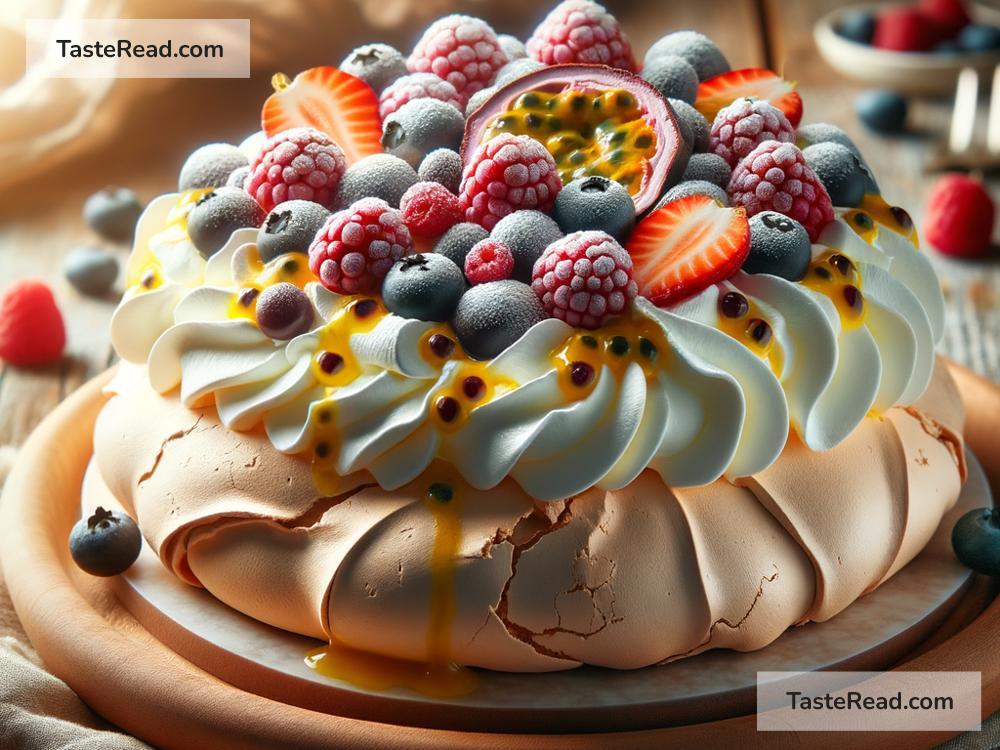
Pavlova is a meringue-based dessert. It’s light, airy, and slightly crisp on the outside, with a soft, marshmallow-like interior. The meringue is topped with whipped cream and fresh fruit, like strawberries, kiwi, and passionfruit. It’s a crowd-pleaser at events, holidays, or even casual gatherings.
Ingredients You’ll Need
The recipe is simple and uses pantry staples:
– 4 large egg whites (room temperature is best)
– 1 cup (220g) of granulated sugar
– 1 teaspoon of vanilla extract
– 1 teaspoon of white vinegar or lemon juice (this helps the texture)
– 2 teaspoons of cornstarch (creates a soft, marshmallowy middle)
– Whipped cream (about 1 cup) for topping
– Fresh fruit (such as strawberries, kiwi, and passionfruit)
Step-by-Step Process
1. Prepare Your Baking Tools
Before you begin, make sure you have a clean mixing bowl (preferably glass or stainless steel) and an electric mixer. Oil or grease can ruin your meringue, so check that everything is spotless.
Preheat your oven to 300°F (150°C) and line a baking sheet with parchment paper. Draw a circle (around 8 inches or 20cm wide) on the parchment paper to guide the shape of your pavlova, but flip the paper so the pencil side is facing down.
2. Separate the Eggs
Carefully separate the egg whites from the yolks. Even a small drop of yolk can prevent the egg whites from whipping properly. Place the egg whites into your clean mixing bowl.
Pro tip: Use room-temperature eggs for better results. Let them sit out for 30 minutes before starting.
3. Whip the Egg Whites
Turn on your mixer to medium speed and whip the egg whites until soft peaks form. Soft peaks mean that the egg whites will hold their shape briefly but will droop slightly when you lift the mixer’s whisk.
4. Add Sugar Gradually
Once you’ve got soft peaks, it’s time to add the sugar — but don’t dump it all in at once! Add one tablespoon at a time, beating well after each addition.
When all the sugar is incorporated, increase the mixer speed to high until the meringue becomes thick and glossy. This may take about 7-10 minutes. To check if the sugar has dissolved, rub a small bit of meringue between your fingers. If it still feels grainy, keep whipping until it’s smooth.
5. Add Vanilla, Vinegar, and Cornstarch
Gently fold in the vanilla extract, vinegar, and cornstarch using a spatula. Be careful not to knock the air out of the meringue. These ingredients help stabilize the pavlova and give it its soft center.
6. Shape the Pavlova
Spoon the meringue mixture onto the parchment paper, spreading it within the drawn circle. Use a spatula to shape the sides into gentle peaks. You can get creative here — make it smooth, or give it a slightly rustic look.
7. Bake Low and Slow
Place the pavlova in the oven and immediately reduce the heat to 250°F (120°C). Baking it at a low temperature ensures the outside gets crispy while keeping the inside soft.
Bake for 1.5 to 2 hours, then turn off the oven and leave the pavlova inside to cool completely. This step prevents cracks from forming due to sudden temperature changes.
8. Top with Cream and Fruit
Once the pavlova has cooled, transfer it carefully to a serving plate. Spread whipped cream generously on top, then arrange fresh fruit in a beautiful pattern. The combination of cream and fruit balances the sweetness of the meringue, creating a perfect bite every time.
Tips for Success
- Avoid Humidity: Pavlova doesn’t like damp weather, as humidity can make it sticky. Try to make it on a dry day for best results.
- Handle with Care: Pavlova is delicate, so be gentle when transferring it to a serving plate.
- Get Creative: Swap out fruits for berries, mangoes, or even grated chocolate, depending on your taste.
Enjoy Your Masterpiece
Congratulations! You’ve just made a light, fluffy pavlova with a crispy shell and marshmallow center. Once you cut into it and taste that perfect balance of sweetness, creaminess, and fruity freshness, you’ll see why this dessert is so beloved.
So go ahead and impress your friends and family at your next gathering. Making pavlova is not as tricky as it seems; all it takes is patience, practice, and a little love. Happy baking!
What’s your favorite fruit topping for pavlova? Let us know in the comments below!