How to Assemble Charcuterie Boards – A Simple Guide for Everyone
Charcuterie boards have become incredibly popular for parties, gatherings, or even cozy nights at home. But what exactly is a charcuterie board? At its core, it’s a selection of meats, cheeses, and other delicious bites arranged beautifully on a platter or board. While it looks fancy, creating one is actually very simple—you just need a bit of creativity and planning! In this blog, we’ll show you how to assemble a charcuterie board step by step in plain, easy-to-understand language.
What You’ll Need
To build a charcuterie board, you’ll need a few basic things:
- A Board or Platter: Any large flat surface works! A cutting board, wooden tray, or even a large plate will do.
- Small Bowls or Cups: For dips, spreads, and tiny items like nuts or olives.
- Serving Utensils: Cheese knives, toothpicks, or small forks for easy serving.
- Food: All the delicious elements that make up the charcuterie board!
Step-by-Step: Building Your Perfect Charcuterie Board
Step 1: Pick Your Meats
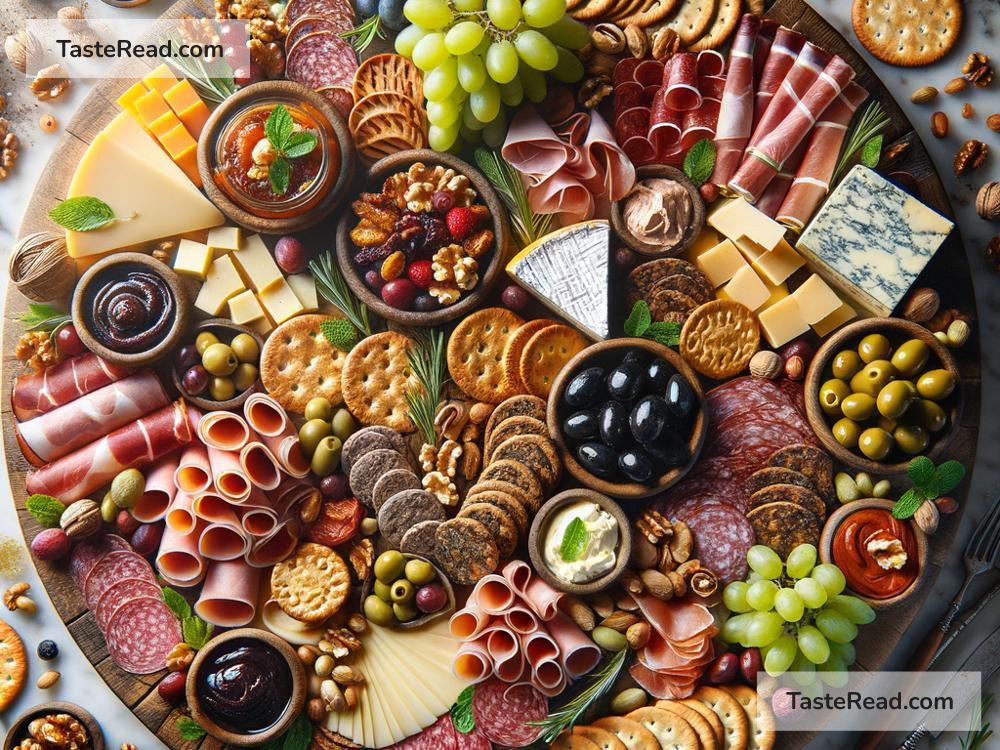
Meat is the heart of a charcuterie board. Popular choices include cured or dried meats like salami, prosciutto, pepperoni, or chorizo. You don’t need too many options—a good rule of thumb is two to four types of meat depending on the size of your board and how many guests you’re serving.
To serve the meats, fold or roll them and arrange them in small bundles or circles around the board. This creates visual interest and leaves room for other items.
Step 2: Choose Your Cheeses
Cheese is the star of many charcuterie boards! Aim for a mix of flavors and textures to keep things exciting. Here are some ideas:
- Soft Cheeses: Brie, goat cheese, or camembert.
- Semi-Hard Cheeses: Gouda, cheddar, or havarti.
- Hard Cheeses: Parmesan or aged pecorino.
- Blue Cheeses: Gorgonzola or blue Stilton (optional).
Place the cheeses in different corners of the board. You can pre-slice hard cheeses or add a knife so guests can cut them themselves. For soft cheeses, leave them whole and include a spreader knife.
Step 3: Add Crackers and Bread
Every charcuterie board needs something to pair with the meats and cheeses. Crackers, breadsticks, baguette slices, or pretzels are great options. Choose a variety—some plain, some with seasoning, and maybe some gluten-free options.
Arrange crackers and bread near the cheese or meat sections so guests can easily create bites.
Step 4: Include Fruits and Vegetables
Fresh or dried fruits add sweetness and color to your board, while veggies bring crunch and balance. Popular choices include:
- Fruits: Grapes, sliced apples, berries, dried apricots, or figs.
- Veggies: Sliced cucumbers, cherry tomatoes, or baby carrots.
Place juicy fruits like grapes or berries in small clusters and sprinkle dried fruits or vegetables around the edges to fill gaps on the board.
Step 5: Add Side Items
Now it’s time to add the fun extras that make your charcuterie board unique. This is where you can really get creative! Here are some popular side items:
- Nuts: Almonds, cashews, or pistachios.
- Pickled Items: Pickles, olives, or marinated artichokes.
- Spreads: Hummus, honey, jam, mustard, or guacamole.
- Other Treats: Chocolate pieces, candy, or popcorn for a sweet twist.
Place small bowls or cups on the board and fill them with dips, spreads, and small loose items like olives or nuts. Scatter any remaining extras around the board to fill spaces.
Step 6: Decorate for Style
Your charcuterie board is almost done! To make it extra appealing, use some decorative touches:
- Add sprigs of fresh herbs like rosemary or thyme for a pop of green.
- Sprinkle edible flowers for a fancy touch.
- Use small signs or labels to identify cheeses if you want it to be clear to guests.
Remember—the goal is to make it look full and varied!
Step 7: Serve and Enjoy
Once your charcuterie board is assembled, the final step is serving it to your guests (or enjoying it yourself!). Pair it with wine or sparkling drinks for an extra special experience. If the board is for a group, make sure you have enough serving utensils to avoid people using their hands.
Tips for Success
- Plan Ahead: Shop for ingredients a day or two before so you have everything ready.
- Balance Flavors: Include salty, sweet, savory, and crunchy items for variety.
- Think About Guests: Consider dietary restrictions, like vegetarian or gluten-free options.
- Start Small: If you’re new to charcuterie boards, don’t make it too complicated. Use a few items and practice your arrangement skills!
Final Thoughts
Creating a charcuterie board is simple, fun, and allows you to show off your creativity. By following these steps, you’ll be able to impress guests at your next party or treat yourself to an elegant snack. Remember, there’s no wrong way to make a charcuterie board—it’s all about trying new ideas and enjoying the food you love.
Now grab your board and start assembling! Who knows? You might discover a favorite combination or become known for your beautiful creations. Happy snacking!