How to Create a Creamy Roasted Garlic Spread
If you love the deep, rich flavor of roasted garlic, then you’re going to adore this creamy roasted garlic spread. It’s smooth, velvety, and bursting with that savory garlic goodness that can instantly elevate sandwiches, crackers, or even your favorite dishes like grilled veggies and roasted meats. The good news? It’s incredibly simple to make with just a few basic ingredients. Best of all, it’s a versatile spread that can be adapted to suit your taste! Let’s dive into the steps to create this flavorful spread.
Why Roasted Garlic?
Garlic is a key ingredient in many recipes, but raw garlic can often be sharp and pungent. Roasting garlic changes the game entirely. When roasted, garlic becomes mellow, sweet, and soft, with a rich umami flavor—it’s almost like candy for garlic lovers! This roasted garlic creates the foundation for the creamy spread and ensures every bite is packed with flavor.
Ingredients You’ll Need
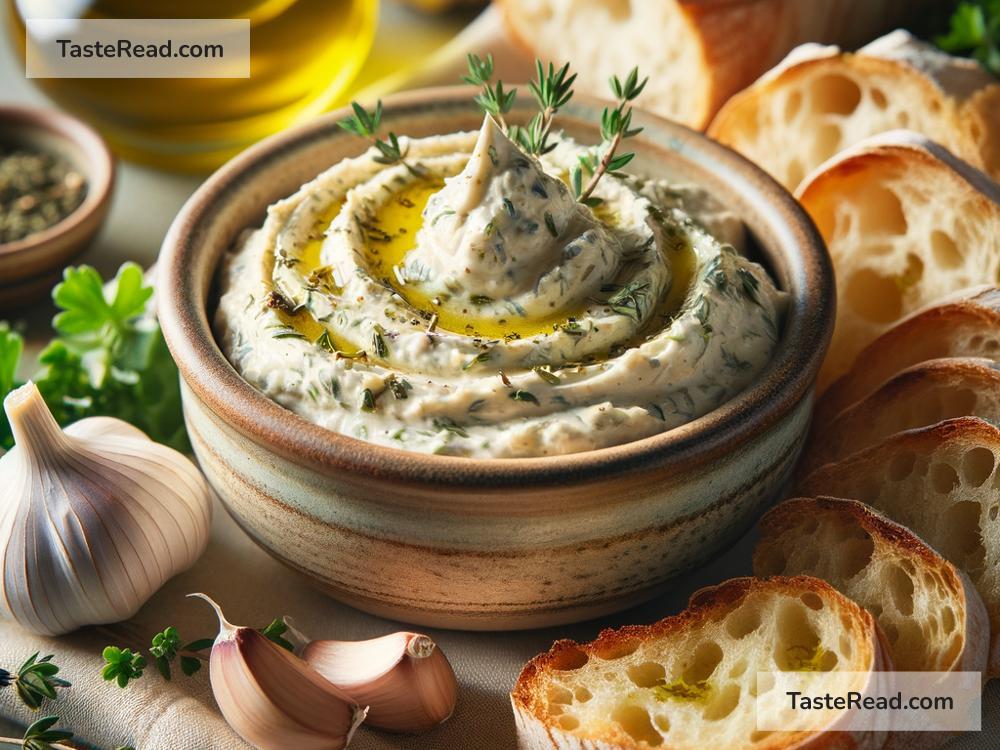
Here’s everything you’ll need to make your creamy roasted garlic spread:
- 2 garlic bulbs (heads of garlic)
- 2–3 tablespoons olive oil
- 1 cup softened cream cheese or Greek yogurt (optional: for a lighter version)
- Salt, to taste
- Pepper, to taste (optional)
- Lemon juice (optional, for added brightness)
That’s it! Many of the items you need are likely already in your kitchen.
Step-by-Step Instructions
1. Prepare the Garlic for Roasting
Start by preheating your oven to 375°F (190°C). Meanwhile, take your garlic bulbs and remove any loose outer layers of papery skin. You don’t need to peel them completely—just the outermost layers.
Next, use a sharp knife to cut off the top of each garlic bulb. This should expose the tops of the cloves. Be careful not to cut off too much; you want enough garlic surface to roast properly while keeping most of the bulb intact.
Place the garlic bulbs onto a piece of aluminum foil or a small baking dish.
2. Add Olive Oil and Roast
Drizzle 1–2 tablespoons of olive oil over each garlic bulb. Make sure the oil covers the exposed tops and sinks slightly into the cloves for that rich roasted flavor. Sprinkle a pinch of salt over the garlic to enhance the flavors.
If using foil, wrap each bulb tightly to seal in the heat. If you’re using a baking dish, you can cover the dish with foil to get a similar effect.
Place the garlic in the oven and roast for about 40–50 minutes. You’ll know the garlic is ready when the cloves are soft, golden brown, and can be easily squeezed out of their skins. If you love garlic, the irresistible smell filling your kitchen will be your first clue that it’s almost done!
3. Cool and Remove the Cloves
Once the garlic is roasted, carefully remove it from the oven (it’ll be hot!). Let the garlic cool for about 10 minutes, or until it’s easy to handle without burning your fingers.
When it’s cool enough, squeeze the roasted garlic cloves out of their skins into a bowl. They should slide out easily, almost like butter.
Pro tip: For an extra smooth texture, mash the roasted garlic with a fork until it forms a paste.
4. Combine with Cream Cheese (or Other Base)
Now it’s time to turn your roasted garlic into a creamy spread! Add the softened cream cheese (or Greek yogurt, if you prefer) into the bowl of roasted garlic. Use the back of a spoon or a mixer to blend the garlic and cream cheese together. Mix until the spread has a smooth, fluffy texture.
If you find the spread a little too thick, add a spoonful of olive oil to loosen it up. Taste-test as you go to adjust the flavors.
5. Season and Customize
Elevate your spread with some simple seasoning! Add a pinch of salt and pepper, or squeeze in a splash of lemon juice to brighten the taste. Some additional ideas to make your roasted garlic spread stand out include:
- Herbs: Add fresh parsley, thyme, or chives for an herby twist.
- Cheese: Mix in shredded Parmesan or grated Asiago for added richness.
- Spice: Stir in red pepper flakes for a touch of heat.
The beauty of this spread lies in its versatility—feel free to get creative!
6. Serve and Enjoy
Your creamy roasted garlic spread is now ready to enjoy. Here are a few serving ideas:
- As a dip: Pair with fresh vegetables, crackers, or chips.
- Spread on bread: Use it as a base for crostini, bruschetta, or sandwiches.
- For cooking: Dollop it over warm pasta, roasted potatoes, or grilled chicken.
Store any leftovers in an airtight container in the fridge for up to 4 days. Just make sure to soften it slightly at room temperature before serving.
Final Thoughts
Creating a creamy roasted garlic spread is a simple yet satisfying way to add bold flavor to your favorite dishes. Whether you’re entertaining guests or indulging in some kitchen creativity, this recipe is a winner. With minimal ingredients, easy preparation, and plenty of room for customization, it’s perfect for garlic lovers everywhere.
So grab a couple of garlic bulbs, fire up your oven, and get ready to enjoy a spread that’s equal parts flavorful and comforting. Once you try this recipe, it’ll surely become a staple in your kitchen!