How to Make Homemade Ricotta Cheese: A Simple Guide
Ricotta cheese is creamy, delicious, and incredibly versatile. It’s perfect for lasagna, stuffed pasta, desserts, or even spread on toast. While you can easily buy ricotta at the store, making it at home is surprisingly simple and more rewarding than you might think. Plus, homemade ricotta tastes fresher and allows you to control the ingredients. In this guide, we’ll walk you through how to make ricotta cheese at home using simple, everyday items and ingredients.
Why Make Ricotta Cheese at Home?
Homemade ricotta has a special charm—it’s creamy and rich, with a taste you can fine-tune to suit your palate. Fresh ricotta is also cheaper to make than store-bought versions and doesn’t contain stabilizers or preservatives. Best of all, the process is super simple and only takes about 30 minutes. Ready to dive in?
What You’ll Need
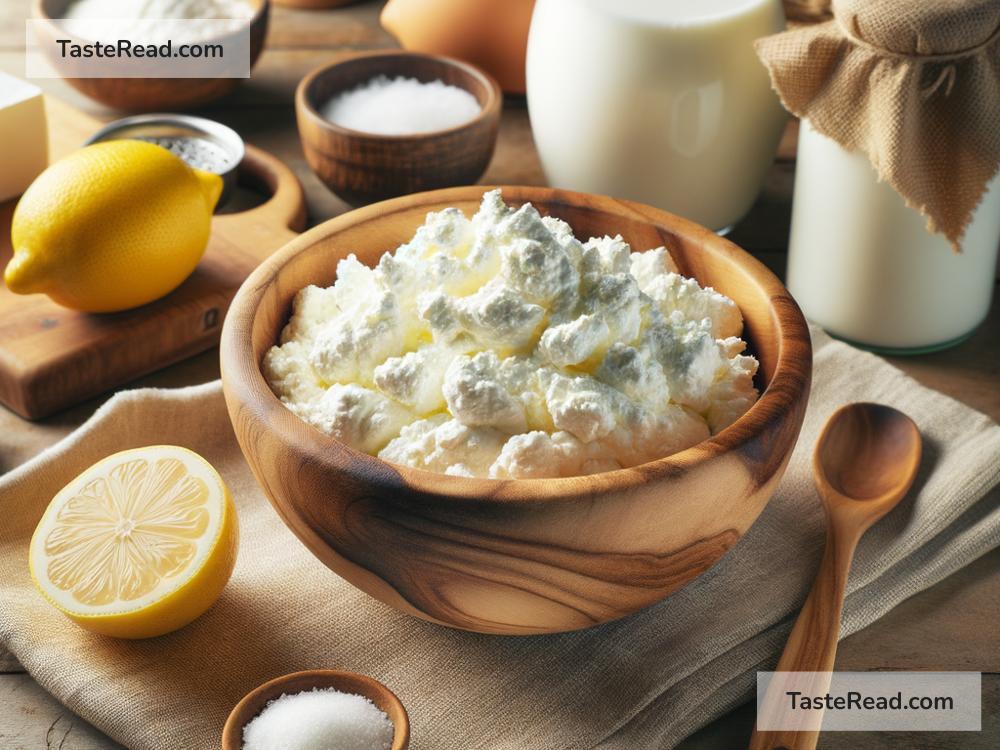
Before we get started, let’s gather the tools and ingredients:
Ingredients
- 4 cups (1 liter) of whole milk
-
Use fresh, high-quality milk for a better taste. Pasteurized milk works, but avoid ultra-pasteurized milk.
-
1 cup (240 ml) of heavy cream
-
This adds extra richness, but you can skip this if you want lighter ricotta.
-
3 tablespoons of lemon juice (or white vinegar)
-
Lemon juice or vinegar helps curdle the milk, separating the solids (curds) from the liquid (whey).
-
A pinch of salt
- Adds flavor to the ricotta. Optional, if you prefer unsalted cheese.
Tools
- Large pot
-
To heat the milk and cream.
-
Candy thermometer or kitchen thermometer
-
Helps you monitor the temperature.
-
Large spoon or spatula
-
For gently stirring the mixture.
-
Strainer or colander
-
To separate the curds from the whey.
-
Cheesecloth or thin kitchen towel
- To line the strainer for finer filtration.
Step-by-Step Instructions
Step 1: Heat the Milk and Cream
Place the large pot on the stove. Pour in the milk and cream. Heat the mixture over medium heat. You don’t need to stir a lot—just occasionally to prevent burning on the bottom of the pot.
Use the thermometer to monitor the temperature. The goal is to heat the mixture to 190°F (88°C). At this temperature, bubbles will form around the edges, but it shouldn’t boil. This step helps break down the milk proteins and prepares them for curdling.
Step 2: Add Lemon Juice or Vinegar
Once the milk and cream reach 190°F, remove the pot from the heat. Stir in the lemon juice (or vinegar) and watch as the magic happens! The milk will start to curdle almost immediately.
You’ll see small clumps forming—that’s the ricotta curds! Let the mixture sit undisturbed for about 5 minutes so the curds can fully form and settle.
Step 3: Separate the Curds from the Whey
Take your strainer or colander and line it with a double layer of cheesecloth or a thin kitchen towel. Place the strainer over a large bowl or the sink, depending on whether you want to save the leftover whey (it’s super nutritious and great for baking or smoothies!).
Carefully pour the curdled mixture into the strainer. The liquid (whey) will flow through, leaving the creamy curds behind.
Step 4: Let It Drain
The next step is to let the ricotta drain. How long you let it drain depends on the texture you want:
- For softer ricotta: Let it drain for 5–10 minutes.
- For firmer ricotta: Drain for 15–20 minutes.
If the cheesecloth gets too full, gently twist it at the top to squeeze out more liquid. Be careful not to over-squeeze, as it can make your ricotta too dry.
Step 5: Add Salt and Store
Once your ricotta is done draining, transfer it to a bowl. Stir in a pinch of salt for flavor. Feel free to taste and adjust the salt to your liking.
If you’re not using the ricotta immediately, store it in an airtight container in the fridge. Homemade ricotta can last for up to 5 days when properly refrigerated.
What to Do with the Leftover Whey
Don’t throw out the whey—it’s packed with nutrients! Here are a few ideas to use it:
- Mix it into smoothies for added protein.
- Use it as a cooking liquid for soups, rice, or pasta.
- Bake bread or pancakes for extra fluffiness.
Tips for Perfect Ricotta
- Experiment with acids: Try using different acids like apple cider vinegar or lime juice for unique flavors.
- Don’t rush: Let the ricotta drain properly so you get your desired texture.
- Fresh is best: While homemade ricotta lasts for a few days, it’s always best enjoyed fresh.
Final Thoughts
Making homemade ricotta cheese is easy and satisfying. By following these simple steps, you can create a creamy, fresh cheese that’s perfect for a wide range of dishes. Whether you’re a seasoned cook or just starting out, this recipe is a great way to learn a fun kitchen skill.
So why not try it today? Grab some milk, cream, and lemon juice, and make your very own ricotta cheese. Once you taste it, you’ll never want to go back to store-bought again!
Happy cheesemaking!