How to Roast Coffee Beans at Home: A Simple Guide
If you love coffee, you know that freshly roasted coffee beans can make all the difference in flavor and aroma. But did you know that you can roast coffee beans at home? It may sound complicated, but with the right tools and a little practice, roasting coffee beans yourself is fun, rewarding, and surprisingly simple.
In this blog, we’ll take you through the basics of roasting coffee beans step by step. You’ll find that it’s easier than you think!
Why Roast Coffee Beans at Home?
Before we dive into the how, let’s talk about the why. Roasting coffee beans at home has several benefits:
1. Freshness: Roasted coffee begins to lose its flavor after a week or two. By roasting your own beans, you ensure they are always fresh!
2. Cost Savings: Green (unroasted) coffee beans are often cheaper than pre-roasted beans. Plus, you won’t need to pay a premium for specialty roasts.
3. Customization: You control how light or dark the roast is, tailoring it to your personal taste.
4. Fun and Learning: Roasting coffee is a creative process and an opportunity to learn about the different stages of coffee preparation.
What You’ll Need
Here are the basics you’ll need to get started:
- Green Coffee Beans: These are the raw, unroasted beans. They’re widely available online or at specialty coffee stores.
- Roasting Equipment: There are several options:
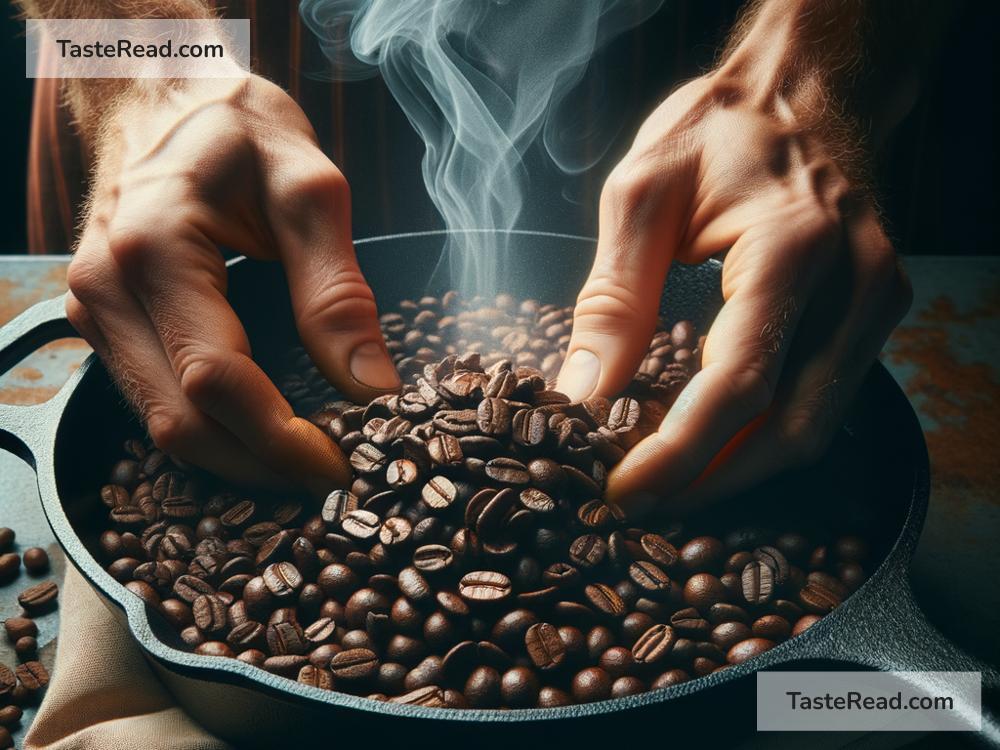
- A stovetop pan or skillet (best for beginners).
- A popcorn maker (air-popping machines can roast coffee).
- A specialized coffee roaster (more expensive but designed for roasting).
- Heat Source: A stove or whatever powers your popcorn maker or roaster.
- A Ventilated Area: Roasting produces smoke, so ensure your kitchen has proper ventilation or use an outdoor space.
- Metal Colander: For cooling the beans after roasting.
- Wooden Spoon or Spatula: For stirring.
- Timer: To track roasting time.
Step-by-Step: How to Roast Coffee Beans
Follow these simple steps to roast coffee beans at home:
Step 1: Prepare Your Space
Set up your tools in a well-ventilated area, as roasting coffee produces a lot of smoke. Open windows, turn on fans, or move outdoors if possible. Lay out your equipment and gather your green beans.
Step 2: Preheat Your Roasting Device
If you’re using a stovetop pan, preheat it on medium heat for a few minutes. For popcorn makers or coffee-roasting machines, follow the manufacturer’s instructions to preheat.
Step 3: Add the Coffee Beans
Place your green coffee beans into the pan or roasting device. Start with a small batch—about half a cup—to ensure even roasting and better control. Spread the beans into a single layer.
Step 4: Stir or Rotate Constantly
While roasting, stir the beans constantly with your spoon or spatula. If you’re using a popcorn maker or coffee roaster, the machine will move the beans for you. Constant movement ensures the beans roast evenly and prevents burning.
Step 5: Observe the Process
Roasting coffee beans is all about watching and listening. There are several stages to look out for:
-
Yellowing (1–3 minutes): The beans will start to turn yellow and smell like cooked grass. This is the early stage of roasting.
-
First Crack (5–8 minutes): The beans begin to pop or crack, similar to popcorn. This means the coffee is reaching a light roast. If you prefer milder flavors, stop here.
-
Darkening (8–12 minutes): The beans turn brown and give off a rich coffee aroma. If you like darker roasts, let them roast past the first crack.
-
Second Crack (10–15 minutes): A second round of cracks will occur. This indicates a dark roast. The beans will look oily, and the flavors will be bold and strong.
Step 6: Cool the Beans
Once the beans reach your desired roast level, remove them from the heat immediately and dump them into a metal colander. Shake the colander or stir the beans gently to cool them down and remove any chaff (papery skin).
Step 7: Let Them Rest
After cooling, let the beans sit for 12–24 hours in a well-ventilated container to “degas.” During this time, the beans release carbon dioxide, which helps improve flavor.
Step 8: Grind and Brew
Finally, it’s time to enjoy your roasted coffee beans! Grind them to your preferred grind size (coarse for French press, medium for drip coffee, fine for espresso), brew your coffee, and savor the flavor.
Tips for Perfect Roasting
- Experiment: Try different roast levels to discover your favorite flavor—light, medium, or dark.
- Take Notes: Write down the time and temperature you use for each batch to improve consistency.
- Store Properly: Keep your roasted beans in an airtight container away from light and heat.
Conclusion
Roasting coffee beans at home is a simple and enjoyable way to take your coffee experience to the next level. With just a few tools and some green beans, you can create delicious, freshly roasted coffee tailored to your taste. So why not give it a try? You may find that your morning coffee becomes even more satisfying when you’ve roasted the beans yourself.
Happy roasting!