How to Make Homemade Pita Bread: A Step-by-Step Guide
Pita bread is a soft, chewy flatbread with a magical puff in the middle—a pocket that makes it perfect for stuffing with delicious fillings like hummus, falafel, or grilled meat and veggies. If you’ve ever wondered how to make pita bread at home, don’t worry, it’s easier than you think! This blog will guide you through making homemade pita bread in simple steps, using just a few basic ingredients. Let’s get started!
Why Make Pita Bread at Home?
Store-bought pita often lacks the fresh taste and fluffiness that homemade pita has. Plus, when you make it yourself, you know exactly what’s going into it—no preservatives or additives. With homemade pita, you get soft, warm bread fresh out of the oven or pan, and it tastes amazing.
What You’ll Need
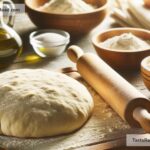
To make pita bread, you only need six basic ingredients that you probably already have in your kitchen:
- 2 ½ cups all-purpose flour (plus extra for dusting)
- 1 teaspoon salt
- 1 teaspoon sugar
- 2 teaspoons active dry yeast
- 2 tablespoons olive oil (or vegetable oil)
- ¾ cup warm water (not too hot—think “bathwater” warm)
Equipment
You don’t need any fancy tools to make pita bread. Here’s what you’ll need:
– A mixing bowl
– A whisk or fork
– A rolling pin
– A clean kitchen towel
– A skillet or baking sheet
– A stovetop or oven
Step 1: Activate the Yeast
Start by activating the yeast. In a small bowl or cup, mix the ¾ cup of warm water, 2 teaspoons of yeast, and 1 teaspoon sugar. Stir gently and let it sit for about 5-10 minutes until it becomes foamy on top. This foam means the yeast is alive and ready to work its magic.
Step 2: Make the Dough
In a large mixing bowl, combine 2 ½ cups of flour and 1 teaspoon of salt. Then, add the foamy yeast mixture and 2 tablespoons of olive oil. Mix everything together using a spoon, fork, or your hands until it forms a sticky dough.
If the dough feels too dry, add a small splash of water. If it feels too wet, sprinkle in a bit more flour. The goal is to make a soft, slightly sticky dough that pulls together into a ball.
Step 3: Knead the Dough
Lightly flour a clean surface and transfer the dough onto it. Knead the dough for about 8-10 minutes. If you’re new to kneading, it’s a simple process: push the dough away from you with the base of your palm, fold it over, and turn it. Repeat this until the dough becomes soft and elastic.
Once you’re done kneading, put the dough back into a lightly oiled bowl. Cover the bowl with a kitchen towel or plastic wrap and let it rest in a warm place for about 1-2 hours, or until it doubles in size.
Step 4: Divide and Shape the Dough
When the dough has risen, punch it down gently to release any air bubbles. Transfer it to a floured surface and divide it into 8 equal pieces. Roll each piece into a ball, then use a rolling pin to flatten each ball into a small circle about ¼ inch thick.
Pro tip: Don’t make the circles too thin—otherwise, they won’t puff up and form that famous pocket during cooking.
Step 5: Cook the Pita
There are two ways to cook pita: on the stovetop or in the oven. Both work great!
Stovetop Method:
Heat a skillet or frying pan over medium-high heat. No oil is needed—just make sure the pan is hot. Place one circle of dough in the pan and cook for about 30-60 seconds on one side, then flip and cook for another 30-60 seconds. You should see it puff up like a balloon! Keep flipping as needed until you get golden spots on both sides.
Oven Method:
Preheat your oven to 475°F (240°C) and place a baking sheet inside to heat. Carefully place the flattened dough circles onto the hot baking sheet and bake for about 3-5 minutes, or until they puff up. Keep an eye on them—they cook fast!
Step 6: Cool and Enjoy
Once your pita bread is cooked, transfer it to a plate or a clean towel to cool slightly. If you want super soft pitas, wrap them in a kitchen towel while they cool. This traps steam and keeps them tender.
Serve your homemade pita bread warm with your favorite dips, spreads, or fillings. It’s perfect for making sandwiches, scooping up hummus, or even eating plain with a drizzle of olive oil.
Tips for Success
- Use warm water: If the water is too hot, it can kill the yeast. Stick to lukewarm water.
- Work quickly: Pita cooks fast! Be ready to flip or pull them out of the oven as soon as they puff up.
- Store leftovers: If you don’t eat all the pita right away, store it in an airtight bag or container at room temperature for up to 2 days. You can also freeze it and reheat later.
Making homemade pita bread is fun, easy, and delicious. With this simple recipe, you’ll never feel the need to grab store-bought pita bread again. Try it today—you’ll be amazed at what you can create with just a few ingredients!