How to Create Savory Roasted Garlic Hummus in Simple English
If you’re looking for a delicious and healthy snack that’s super easy to make, roasted garlic hummus could be the perfect choice. This creamy, flavorful dip goes great with pita bread, veggie sticks, or even as a spread on sandwiches. With just a few simple ingredients and steps, you’ll have a savory roasted garlic hummus that will impress your taste buds and guests alike. Let’s dive into how you can make it at home!
Why Roasted Garlic?
Garlic is the star of this hummus recipe, and roasting it takes the flavor to a whole new level. Raw garlic can be sharp and pungent, but roasting gives it a sweet, mellow taste that blends beautifully into hummus. Plus, roasted garlic adds a rich depth of flavor without overpowering the dish.
Ingredients You’ll Need
Before jumping into the recipe, gather these ingredients:
- 1 whole garlic bulb
- 1 can of chickpeas (15 oz)
- 2–3 tablespoons of olive oil (plus more for roasting)
- 2 tablespoons of tahini (a paste made from ground sesame seeds)
- Juice of 1 lemon
- 1 teaspoon of ground cumin
- Salt to taste
- Water (to adjust consistency)
That’s it—just a handful of pantry staples! You can customize this recipe with spices and toppings later, but sticking to these basics ensures a perfect roasted garlic hummus.
Step 1: Roast the Garlic
Roasting the garlic is the first and most important step. Here’s how:
- Preheat your oven to 375°F (190°C).
- Take your garlic bulb and slice off the top to expose the cloves. Don’t peel them—leave the skin on.
- Place the garlic bulb on a sheet of aluminum foil. Drizzle about 1–2 teaspoons of olive oil over the exposed cloves.
- Wrap the garlic tightly in the foil and place it in the oven. Let it roast for about 35–40 minutes, or until the cloves are soft and golden brown.
- Once roasted, let the garlic cool down slightly before handling. Then, gently press the cloves out of their skins—this step feels oddly satisfying!
Roasted garlic cloves are so delicious, you might want to eat one straight away. Don’t worry, you’ll still have enough for the hummus!
Step 2: Prepare the Ingredients
Now that your garlic is roasted, it’s time to get everything ready for blending:
- Drain and rinse the chickpeas from the can to remove the liquid and salt.
- In your blender or food processor, combine:
- The chickpeas
- Roasted garlic cloves (use the whole bulb for maximum flavor!)
- 2–3 tablespoons of olive oil
- 2 tablespoons of tahini
- The juice of 1 lemon
- 1 teaspoon of cumin
- A pinch or two of salt, depending on your taste
Step 3: Blend It Up
Turn on your blender or food processor and start mixing everything together. You may notice the mixture looks thick. Don’t panic! Slowly add water, one tablespoon at a time, until you reach your desired consistency.
If your blender is struggling, scrape down the sides occasionally and stir the mixture to help it blend evenly. The goal is to have a creamy, smooth texture. Taste-test along the way and adjust the salt, lemon juice, or cumin as needed.
Tip: If you prefer an ultra-smooth hummus, you can peel the chickpeas before blending. But this step is entirely optional!
Step 4: Serve and Enjoy
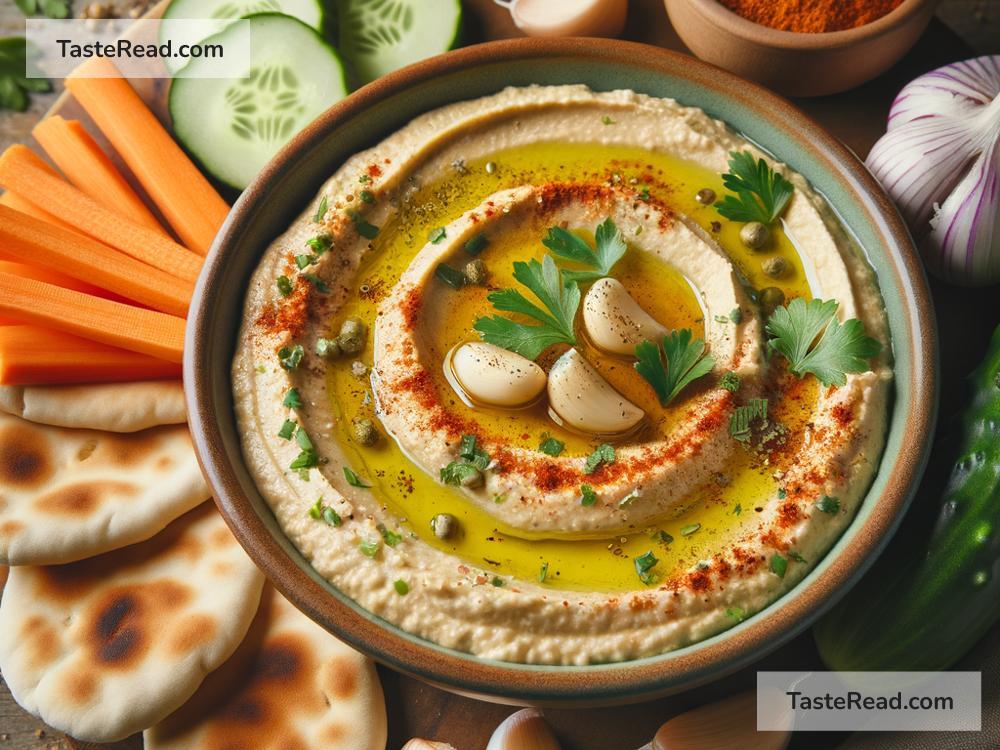
Once your hummus is ready, scoop it into a bowl and get creative with toppings. Here are some ideas to make your roasted garlic hummus look fancy:
- Drizzle extra olive oil on top for a beautiful sheen.
- Sprinkle paprika, chopped parsley, or sesame seeds for added color.
- Add a few whole roasted garlic cloves as garnish.
Serve your hummus with pita bread, crackers, veggies like carrot sticks or cucumber slices, or use it as a spread on sandwiches and wraps. The possibilities are endless!
Tips for Success
- Fresh Ingredients: Make sure your garlic, lemon, and tahini are fresh for the best flavor.
- Customizable Recipe: You can add other flavors like smoked paprika, roasted red peppers, or even a dash of hot sauce for a spicy kick.
- Storage: Store leftover hummus in an airtight container in the refrigerator. It’ll stay fresh for up to 5 days.
Why Make Homemade Hummus?
Store-bought hummus can be convenient, but homemade hummus has unbeatable freshness and flavor. Plus, you control the ingredients—no preservatives, excessive salt, or artificial flavors. It’s health-friendly, cost-effective, and satisfying to make!
Final Thoughts
Roasted garlic hummus is a simple yet delicious recipe that you can whip up in under an hour. Whether you’re hosting a party or enjoying a quiet afternoon snack, this creamy, savory dip is bound to be a hit. Once you master this basic recipe, feel free to experiment with more flavors and spices. Give this recipe a try, and you’ll never go back to store-bought hummus again!
Happy cooking, and enjoy your homemade roasted garlic hummus!