How to Garnish Delicate Desserts: Simple Tips for a Stunning Presentation
Desserts are often the highlight of any meal, but what truly transforms a sweet treat into a work of art is the garnish. Garnishing delicate desserts requires both creativity and a gentle touch to ensure your masterpiece looks as good as it tastes. If you’ve ever wondered how professional chefs make their desserts so elegant, you’re in luck! In this article, we’ll explore simple ways to garnish delicate desserts at home, even if you’re not a pastry expert.
Why Garnish Desserts?
Before diving into techniques, let’s discuss why garnishing desserts is important. A garnish isn’t just about looks—it can add flavor, texture, and personality to your dessert. A drizzle of chocolate sauce, a sprinkle of powdered sugar, or a fresh mint leaf can transform an ordinary treat into something truly special. Plus, beautifully garnished desserts are more eye-catching and inviting, making them perfect for dinner parties, birthdays, or photos for social media.
The Basics: Tools, Ingredients, and Preparation
Before you start garnishing, it’s a good idea to gather the right tools and ingredients. Here are some essentials to have on hand:
Tools:
– Piping bags or squeeze bottles for sauces.
– A fine mesh sieve for dusting powdered sugar or cocoa powder.
– Small tongs or tweezers to place delicate components like edible flowers or fruit slices.
– Paring knives for precise cuts.
– Graters or peelers for chocolate shavings, citrus zest, or curls.
Ingredients:
– Fresh herbs like mint or rosemary.
– Edible flowers such as pansies or nasturtiums.
– Seasonal fruits, including berries, citrus slices, or star fruit.
– Sauces like caramel, chocolate, or fruit coulis.
– Spices such as cinnamon or nutmeg for dusting.
– Textures like crushed nuts, cookie crumbs, or chocolate shavings.
Make sure your garnishes are fresh, vibrant, and appropriate for the dessert you’re serving. For instance, a rich chocolate cake pairs beautifully with a sprinkle of nuts or a fresh mint leaf, while a light lemon mousse might benefit from zest, berries, or edible flowers.
Garnishing Techniques for Different Desserts
Now let’s dive into specific techniques for decorating various kinds of desserts.
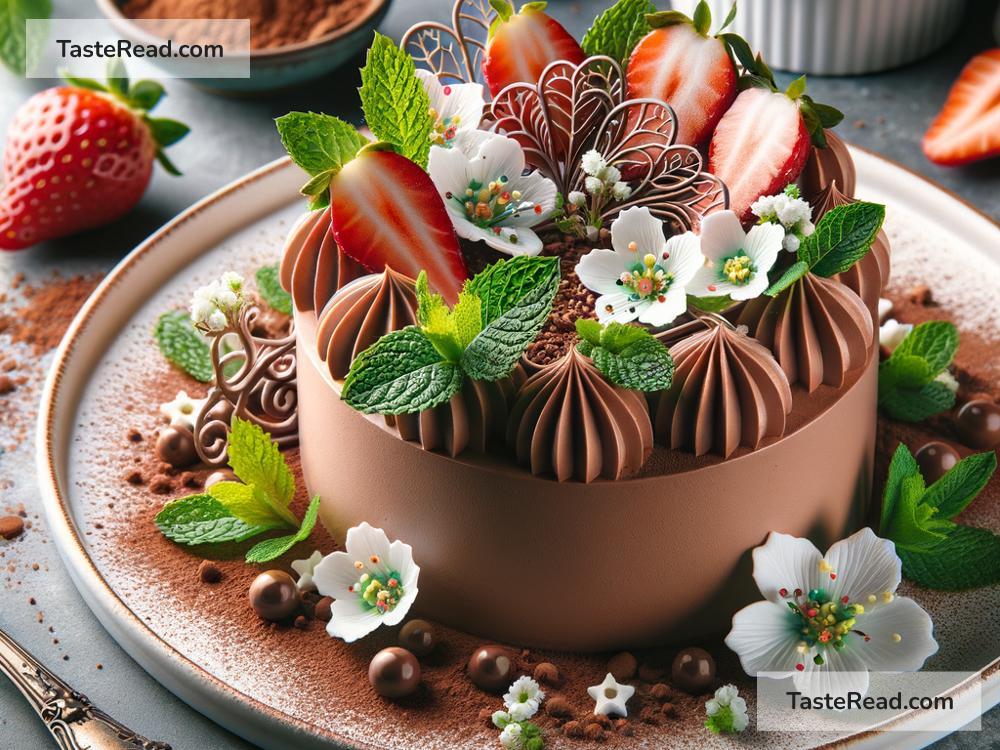
1. Cakes and Cupcakes
Cakes and cupcakes offer a great canvas for garnishing. Here are a few tips:
– Piping Designs: Use a piping bag filled with frosting to create swirls, rosettes, or borders on cupcakes and cakes. You can add sprinkles or edible glitter to make the designs pop.
– Fresh Fruit: Arrange slices of strawberries, blueberries, or raspberries on top for a refreshing touch. A fan of sliced strawberries creates a pretty and professional look.
– Drizzles: Warm and drizzle melted chocolate or caramel sauce over the cake for additional flavor and visual appeal. Use a squeeze bottle for precision.
2. Mousses, Puddings, and Custards
Soft desserts like mousses and puddings benefit from light, complementary garnishes.
– Layering: Serve these desserts in clear glasses to show off the layers. Add a dollop of whipped cream on top and sprinkle crushed cookies or nuts for texture.
– Zest: A quick citrus zest (like lemon or orange) over the surface adds bright flavor and color.
– Cookies or Wafers: Place a biscuit or wafer gently on top of the mousse to balance the delicacy of the dessert.
3. Ice Creams and Sundaes
Ice cream is always a crowd favorite, and adding garnishes makes it even better.
– Drizzles and Sauces: Chocolate sauce, caramel, or fruit puree add vibrant color and flavor. Allow the sauce to slightly drip over the sides for a tempting look.
– Crunchy Elements: Sprinkle crushed nuts, cookie crumbs, or granola on top.
– Cherries and Whipped Cream: A classic garnish for sundaes, these add height and color.
4. Tarts and Pies
Tarts and pies have a sturdy base, making them ideal for garnishing.
– Dusting: Add powdered sugar or cocoa powder through a fine mesh sieve. You can even use stencils to create intricate designs.
– Arranged Fruit: Create patterns with sliced fruit such as kiwi, strawberries, or peaches, layering them neatly across the top.
– Chocolate Shavings: Use a vegetable peeler to make chocolate curls and scatter them over the tart for an elegant look.
5. Cookies
Although cookies are smaller, they can still be garnished beautifully.
– Drizzles and Dips: Dip cookies halfway into melted chocolate and sprinkle toppings (like coconut flakes or crushed nuts) before the chocolate sets.
– Powdered Sugar: Dust arch-shaped cookies or shortbread with powdered sugar for a snow-like effect.
– Decorative Icing: Use icing to draw simple shapes like hearts or zigzags.
A Few Tips for Success
- Keep It Simple: Don’t overdo the garnishing. Too many elements can overwhelm the dessert and make it look cluttered.
- Match Flavors: Choose garnishes that complement the flavors of your dessert. For example, tart berries go well with sweet dishes, and chocolate pairs nicely with nuts.
- Practice Precision: For delicate desserts, precision is key. Use tools like tweezers or small tongs to place tiny garnishes carefully.
- Use Edible Options: Make sure everything you add to the dessert is safe to eat. Edible flowers and herbs should be fresh and free from chemicals.
Final Thoughts
Garnishing delicate desserts is a fun and creative way to take your baking to the next level. You don’t need to be a professional chef to make your desserts look stunning—just a bit of practice and attention to detail will help. Experiment with different garnishes to discover what works best for your creations. The next time you serve dessert, watch how your guests’ eyes light up at the sight of your beautiful presentation! Happy garnishing!