How to Create Homemade Lemon Bars in Simple English
Lemon bars are a delightful treat that combines a tangy lemon filling with a buttery crust—a perfect dessert for any occasion! The best part? You don’t need to be a professional baker to make them. In this article, we’ll show you how to create delicious homemade lemon bars in simple steps.
What Are Lemon Bars?
Lemon bars are dessert bars that consist of two layers: a melt-in-your-mouth crust made of buttery shortbread and a refreshing lemon filling that’s perfectly balanced between sweet and sour. The bright lemony flavor makes them a crowd favorite.
So, let’s roll up our sleeves and get started!
What You’ll Need
Here’s everything you’ll need to make your lemon bars. You probably have most of these ingredients sitting in your kitchen already!
For the crust:
– 1 cup (2 sticks) unsalted butter, softened
– 1/2 cup granulated sugar
– 2 cups all-purpose flour
– Pinch of salt
For the lemon filling:
– 4 large eggs
– 1 1/2 cups granulated sugar
– 1/4 cup all-purpose flour
– Zest from 2 lemons
– 2/3 cup freshly squeezed lemon juice (about 4–6 lemons)
Optional for topping:
– Powdered sugar for dusting
Step-by-Step Instructions
Step 1: Preheat the Oven
Preheat your oven to 325°F (165°C). Take out a 9×13-inch baking dish and grease it lightly with butter or line it with parchment paper for easier removal later.
Step 2: Make the Crust
- In a mixing bowl, cream together the softened butter and granulated sugar until smooth. You can use a hand mixer or a wooden spoon for this.
- Add the flour and a pinch of salt. Mix until the dough becomes crumbly but holds together when pressed.
- Transfer the dough to your prepared baking dish. Use your hands or the back of a spoon to press the dough evenly into the bottom of the dish to form the crust layer.
- Bake the crust in the preheated oven for 15–20 minutes, or until it’s lightly golden. Make sure not to let it over-bake as it’ll continue to cook later with the lemon filling.
Remove the crust from the oven once done, but keep the oven preheated for the next step.
Step 3: Prepare the Lemon Filling
- In a large mixing bowl, whisk together the eggs and granulated sugar until the mixture is smooth and slightly frothy.
- Add the flour and whisk again to remove any lumps.
- Stir in the lemon zest and freshly squeezed lemon juice. The lemon zest gives an extra punch of flavor, so don’t skip this step!
- Taste the mixture—it should be bright and tangy, but just sweet enough. Adjust the sugar or lemon juice slightly if needed.
Step 4: Combine and Bake
- Pour the lemon filling mixture evenly over the baked crust.
- Place the baking dish back into the oven and bake for 25–30 minutes. The filling should set but still have a slight jiggle in the middle. Be careful not to over-bake, as it can make the filling rubbery instead of smooth and creamy.
Step 5: Cool and Slice
- Once the lemon bars are done, remove them from the oven and let them cool completely in the baking dish, about 1–2 hours. Cooling helps the filling set properly and makes slicing easier.
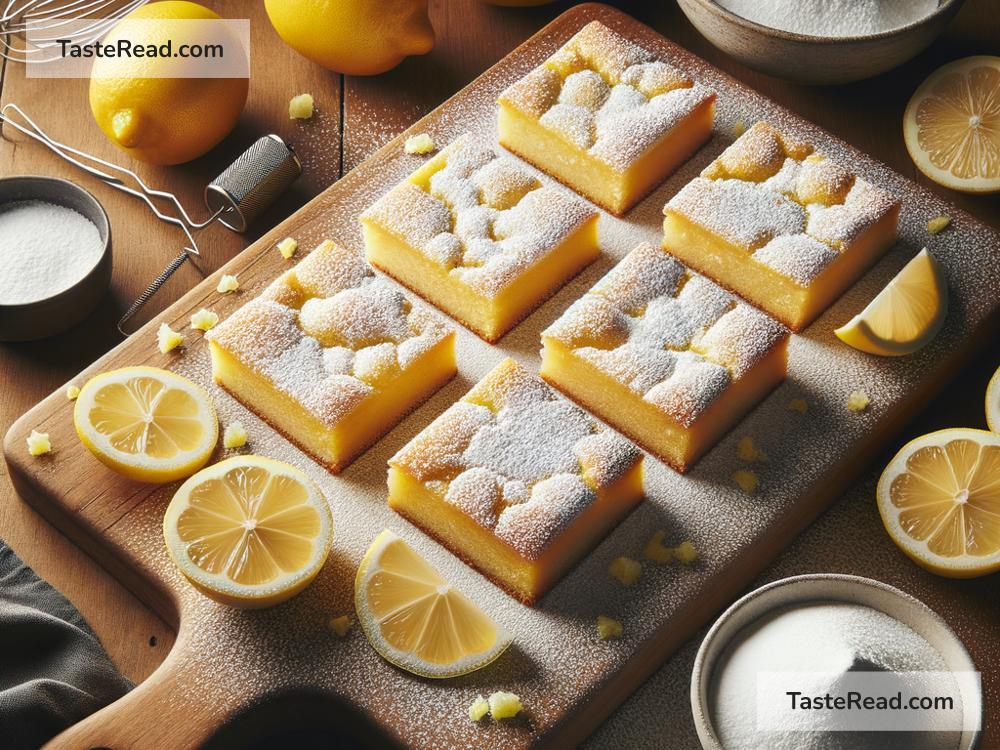
- Once cooled, you can dust the top with powdered sugar for extra sweetness and presentation.
Use a sharp knife to cut the lemon bars into squares or rectangles. Wipe the knife clean between cuts to keep the edges neat.
Bonus Tips
- Fresh lemons are key. Bottled lemon juice won’t give the same vibrant flavor.
- Shift the consistency. If you like your lemon bars more tart, reduce the sugar in the filling slightly. If you prefer them sweeter, add a little extra sugar.
- Powdered sugar coating. Wait until the bars are cooled completely before dusting with powdered sugar, or it may melt into the filling.
Storing Lemon Bars
If you have leftovers (although they’ll disappear quickly), store them in an airtight container in the refrigerator for up to 4 days. They taste amazing chilled and can even be frozen for up to 3 months.
Final Thoughts
Homemade lemon bars are simple to make and absolutely delicious. The combination of buttery crust and tangy filling creates a dessert that will impress your family and friends. Whether you whip them up for a party, a picnic, or just because you’re craving something sweet, these lemon bars are sure to become a go-to recipe.
Next time life gives you lemons, don’t just make lemonade—make lemon bars! Enjoy cooking, baking, and eating these delightful treats. Let us know how they turn out for you!
Happy baking! 😊